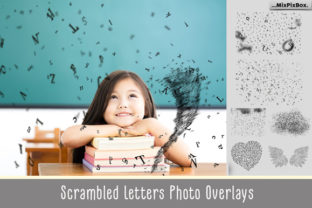
Confetti Overlays PS Brushes: Stop the Magic Moment
Capturing a fleeting moment of joy is one thing, but preserving the atmosphere of that celebration requires a different kind of craft. Whether you are documenting a wedding, designing a promotional graphic for a product launch, or simply enhancing a personal portrait, the difference between a good image and a memorable one often lies in the details. This is where Confetti Overlays PS Brushes become an indispensable tool in your creative arsenal. They allow you to stop the magic moment, freezing the energy of a celebration and infusing it into static imagery with precision and style.
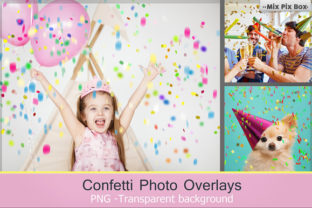
The concept is simple yet powerful: a touch of romance, a surreal pattern, or a trace of gentle outlines can completely transform the mood of a photograph. In a comprehensive pack featuring 34 overlays of confetti textures, you gain access to shimmering elements that float, fly past, or spread out on the floor to form a charming atmosphere. These are not just random specks of color; they are carefully designed assets intended to blend seamlessly with your existing work, adding depth and narrative without overpowering the subject.
Understanding the Toolset
At its core, this resource offers two distinct methods for application: pre-made PNG overlays and customizable Photoshop brushes. The 34 Confetti overlays come in high-resolution PNG format with transparent backgrounds, measuring 5000 x 3333 pixels at 300 DPI. This resolution ensures that whether you are printing a large-format poster or displaying an image on a high-definition screen, the edges remain crisp and the details sharp. Because they are layer-based, they are compatible with any software that allows you to work with layers, including Photoshop, Photoshop Elements, Paint Shop Pro, PicMonkey, GIMP, and others.
Complementing these overlays are 14 Confetti brushes for Adobe Photoshop in ABR format. While overlays provide instant atmospheric changes, brushes offer granular control. They allow you to paint confetti exactly where you need it, adjusting density, flow, and direction to match the lighting and perspective of your original photo. This dual approach ensures that both novice editors and seasoned designers can find a workflow that suits their specific project needs.
Creative Applications Across Industries
The versatility of confetti effects extends far beyond party invitations. For marketers and small business owners, these tools can inject a sense of excitement into product photography. Imagine a new skincare launch where delicate gold flakes drift around the bottle, suggesting luxury and celebration. Or consider a tech startup announcing a major milestone; a burst of vibrant, geometric confetti can visually communicate success and innovation without the need for an expensive photoshoot.
Wedding photographers and event planners also find immense value in these assets. Sometimes, the weather doesn't cooperate, or the budget doesn't allow for physical confetti cannons. By using digital overlays, you can create the illusion of a grand exit or a joyful reception moment in post-production. The key is subtlety. Drag your favorite overlay on the photo to create unforgettable compositions, but remember to adjust the opacity and blending modes. A "Screen" or "Lighten" mode often works best to make the confetti look like it belongs in the scene's lighting environment.
Bloggers and social media managers can use these textures to break up text-heavy graphics or to add a festive border to seasonal content. During holidays or special sales events, a consistent confetti theme across your Instagram stories or Pinterest pins can create a cohesive brand identity that feels celebratory and engaging.
Techniques for Realistic Integration
To ensure your results look professional rather than pasted-on, focus on positioning and resizing. What remains is positioning and resizing to match the perspective of your base image. If your subject is looking upward, the confetti should appear to be falling from above, perhaps with some pieces blurred to indicate motion. If the confetti is on the floor, it should follow the ground plane's perspective lines.
One effective technique is to use selected areas of the photos. You don't have to apply the effect to the entire canvas. It goes without saying that you can also use selected areas of the photos and voila – the magic is in all its glory. For instance, you might mask out the subject's face to keep it clear while allowing confetti to cascade around their shoulders. This creates depth and frames the subject naturally.
Color grading is another critical step. If your photo has a warm, golden-hour glow, cool blue confetti might look disjointed unless intentionally stylized. Use adjustment layers to tint the confetti to match the ambient light of your scene. This attention to color harmony makes the difference between a composite that looks fake and one that feels like a captured reality.
Ideas for Varied Styles
- The Minimalist Approach: Use sparse, single-color confetti against a clean background for modern, editorial-style layouts. This works well for fashion blogs or luxury branding.
- The Surreal Dream: Combine multiple overlays with different opacities and blur levels to create a dreamlike, ethereal quality. This is perfect for artistic portraits or music album covers.
- The Dynamic Burst: Utilize the Photoshop brushes to paint a concentrated explosion of color emanating from a specific point, such as a popping cork or an opening gift box.
- The Textured Background: Place a dense confetti layer behind your text or subject and lower the opacity significantly to create a subtle, textured backdrop that adds interest without distraction.
Maintaining Consistency and Quality
When working on a series of images, consistency is key. If you are creating a campaign, decide on a specific confetti style—perhaps only gold circles or only pastel triangles—and stick to it across all assets. This reinforces brand recognition. Keep your layers organized by naming them clearly (e.g., "Foreground Confetti," "Background Blur") so you can easily tweak them later if the client requests changes.
Furthermore, consider your audience. For a corporate annual report, a subdued, metallic confetti effect might convey success appropriately. However, for a children's birthday invitation, bright, multi-colored shapes with a playful scatter pattern would be more effective. Always align the visual style with the emotional tone you wish to evoke.
Ultimately, these tools are about enhancing your storytelling. They provide the visual vocabulary to say "celebration," "success," or "joy" instantly. By mastering the balance between the digital asset and your original photography, you can produce work that resonates with viewers and stands out in a crowded digital landscape. Choose the desired formation and lay it over your picture, then let your creativity guide the final adjustments. With high-quality assets and a thoughtful approach, you can turn ordinary snapshots into extraordinary visual narratives.